Формуляр сопровождения
| Это незавершённая статья. Вы можете помочь проекту, исправив и дополнив её. |
Содержание
Общие сведения
Самолет, который отображается на экране радиолокационной меткой имеет рядом формуляр сопровождения, которые показывает необходимую диспетчеру информацию про текущее состояние полета данного ВС. В EuroScope у Вас всегда есть возможность настроить по собственному усмотрению внешний вид и/или поведение всех элементов формуляра. Подробней про изменение и настройку формуляра в статье Редактор формуляров (TAG Editor).
Каждое семейство формуляров имеет 8 различных типов формуляра:
- Primary only (Только первичная метка)
- Uncorrelated A+C mode (Нескоррелированная метка режима А+С)
- Uncorrelated S mode (Нескоррелированная метка режима S)
- Correlated A+C mode (Скоррелированная метка режима А+С)
- Correlated S mode (Скоррелированная метка режима S)
- Flight plan track (Метка полетного плана)
- Ground S mode (Наземная метка режима S)
- Ground no radar (Наземная нерадиолокационная метка)
Типы формуляра соответствуют состоянию радарного опознавания самолета. Детальнее это описано в статье Симуляция профессионального радиолокатора.
Каждый тип формуляра имеет 3 различных состояния:
- Detailed (Детальный)
- Tagged (Меченный)
- Untagged (Немеченный)
Состояние формуляра соответствует текущему состоянию ВС в диспетчерской системе. Больше информации про состояния формуляров находится в статье Редактор формуляров (TAG Editor).
Формуляры Matias
EuroScope по умолчанию имеет неизменяемое семейство формуляров Matias. Они очень похоже симулируют формуляры, используемые в реальных венгерских ANS системах - формуляр Matias содержит большое количество нужной информации и также очень похож на формуляры других реальных системa, к примеру Eurocat. Тем не менее, если Вы хотите симулировать другую систему, Вы всегда можете ее для себя создать.
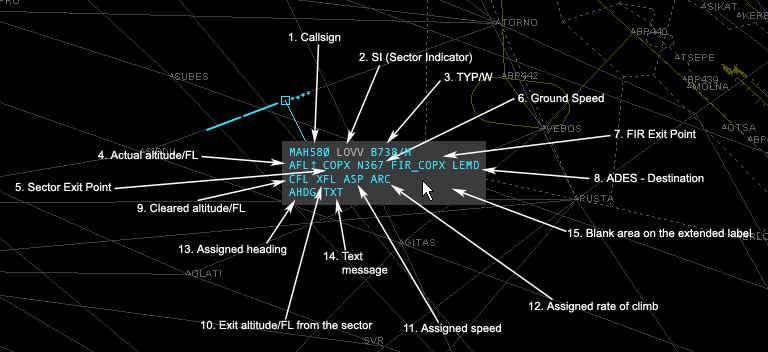
Детальный формуляр Matias
Детальный формуляр появляется, когда Вы наводите курсор мышки на меченый формуляр. В один момент времени лишь один формуляр может быть детальным. Это состояние формуляра сопровождения имеет ряд функций связанных с его элементами.
1. Позывной (Callsign) - отображает позывной ВС.
Когда Вы контролируете данное ВС при щелчке левой кнопкой мышки по этому полю появляется всплывающее меню, которое позволяет Вам передать это ВС другому диспетчеру:
The first list comes up if there is a controller who is controlling the sector just after yours. The second list is missing the transfer command when no next controller is detected. The functions are the followings:
- transfer - initiates a handoff to the controller next to your sector.
- manual transfer - pops up another list with all the available controllers; select one from the list and a handoff is initiated to him/her.
- release - simple drops the aircraft.
When another controller has initiated a handoff to you then another popup menu is available (the first picture displays the initiated handoff):
- assume - accept handoff.
- refuse - refuse handoff.
2. Sector Indicator - indicates the current or the next sector controller
When you are not tracking the aircraft it simply indicates the controller who is tracking it. "--" means no controller owns it. If no owner of the aircraft at all then a left click here starts tracking it.
When you are tracking the aircraft it indicates the controller of the next sector. If no online controller who is controlling the next sector then a "--" will appear here. By right button click the controller short ID can be changed to the primary frequency. EuroScope will change the ID to frequency automatically when the aircraft is within 3 minutes to the borderline.
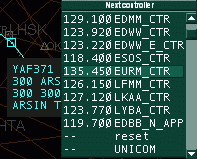
You have the chance to override the next controller calculated by EuroScope. Click with the left button on the sector indicator. It opens a popup menu with the reachable controllers. Select one from the list. It will be assumed as next controller independently what sectors are next. The overridden controller is flagged by accepted ongoing coordination color. Select reset to allow EuroScope to detect the next controller based on route and sectors. You also have the possibility to delete next controller by selecting UNICOM.
3. Aircraft type - the type of the aircraft coming from the flight plan
By clicking on it with the right button you can toggle its display in the Tagged TAG. The type is followed by the aircraft category sign (by default /H or /M or /L or /J ) and the communication type ( /r or /t or /? ) is here also. Note that from version 3.0 EuroScope never displays the /v as voice is the default communication form on VATSIM and we would like to save spaces. Only the different or unidentified types are flagged. To set the communication type just click on the sign (there are to spaces in the detailed TAG for /v types that allows the mouse clicks). Then a popup menu appears to select the right type.
4. Actual altitude/FL - the actual altitude or flight level of the aircraft Below transition altitude an "A" letter is followed by two or three digits (the altitude value in 100 feet)( A50 or A05 or A115). Above transition altitude the flight level is displayed with three digits ( 050 or 380). The actual altitude/flight level value may be followed by an arrow pointing up or down. The arrow indicates the altitude change direction (climb or descent). With right button click it toggles the route display of the aircraft.
5. Sector entry/exit point - the next coordination point along the route
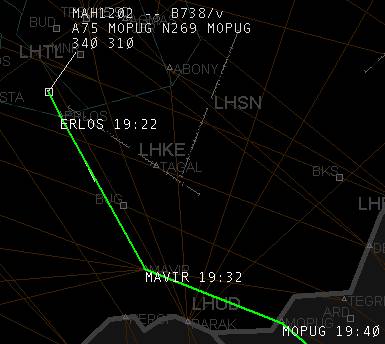
The coordination points are defined in the EuroScope Sector Extension file (смотрите: Описание ESE файла). If a controller owns both sectors of the coordination point then that one is ignored and the next one will be displayed. In this picture I am Budapest Radar and no approach is online. Therefore the coordination point over ERLOS is not active as I control both sectors. Only the FIR exit point MOPUG is effective.
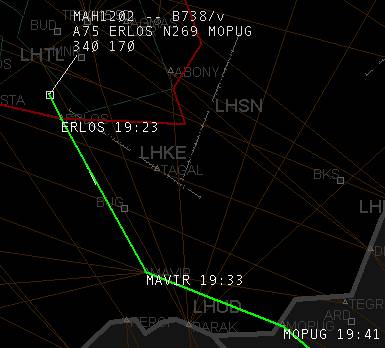
But in this picture Budapest Approach comes online. Therefore coordination point ERLOS becomes active.
By a left click on this piece you can start an entry or exit point coordination with the previous or the next sector controller. Detailed information about the ongoing coordination can be found in Связь между диспетчерами (Controller To Controller Communication).
6. Ground speed - the ground speed of the aircraft
The format is a letter "N" then the ground speed value. By clicking on it with the right button you can toggle its display in the Tagged TAG.
7. FIR exit point - the coordination point along the route where the aircraft leaves the actual FIR
The definition of the FIR exit point is similar to the sector exit point. By clicking on it with the right button you can toggle its display in the Tagged TAG.
8. Destination - the ICAO code of the destination airport
A left button click on this item opens the Flight Plan Setting Dialog where you can amend the flight plan. By clicking on it with the right button you can toggle its display in the Tagged TAG.
9. Cleared altitude/FL - the altitude or flight level cleared to be reached
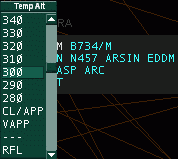
That is actually the temporary altitude in VATSIM. A left click on this item opens a popup menu with a list of the altitudes and flight levels from ground to FL610. If the aircraft has cleared flight level then it will be selected. Just select one and it will be assigned to the aircraft.
There are four special elements in this popup list:
- CL/APP - select this items to indicate that the AC is cleared for ILS approach.
- VAPP - select this items to indicate that the AC is cleared for a visual approach.
- --- - this selection clears the temporary altitude setting the final as cleared.
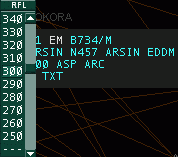
- RFL - this popup menu will open another popup menu that allows you to change the requested flight level/altitude.
Important: When making a simulation session (alone or for a candidate) setting the cleared level via the popup menu will drive the simulated aircraft to the specified altitude.
10. Exit altitude/FL from the sector - the coordinated altitude or flight level at the next coordination point
If no such point defined then the final cruising altitude. See the pictures again from the /sector exit point/ description. In this picture no approach is online. Therefore the next coordination point is the FIR exit point MOPUG. The coordination altitude is FL310 there.
When approach is online then the coordination point is ERLOS and the coordination altitude is FL170.
Clicking on this item with left button the sector entry/exit point altitude popup opens up that allows a coordination with the previous or the next sector controller. Detailed information about the ongoing coordination can be found in the Связь между диспетчерами (Controller To Controller Communication).
11. Assigned speed - the speed assigned to the aircraft
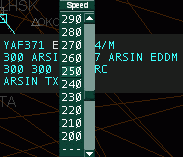
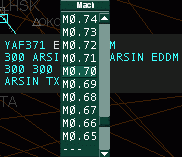
If no speed is assigned then a static string ASP . If has an assigned IAS then a letter S then the assigned speed. If a Mach number is set then a "M" then the assigned Mach. With a left click you can open a popup list with the available values from 120-400. With a right click the Mach values are popped up from 0.60 to 1.00. Select the one to be used. To clear it select the item with "--". Assigned speed/Mach number is propagated to other controllers via scratch pad text in a form SXXX or MXXX. If the other controller uses EuroScope too this type of scratch pad text will be recognized as assigned speed.
Important: When making a simulation session (alone or for a candidate) setting the assigned speed will drive the simulated aircraft to the specified speed.
12. Assigned rate of climb/descend - the assigned rate of climb or descend to the aircraft.
If no rate is assigned then a static string *ARC* otherwise a letter "R" then the assigned rate. Similarly to the assigned speed you can select the rate values from the popup list. Assigned rate is propagated to other controllers via scratch pad text in a form RXXXX. If the other controller uses EuroScope too this type of scratch pad text will be recognized as assigned rate.
13. Assigned heading - the assigned heading to the aircraft. If no heading is assigned then a static string *AHDG* otherwise a letter "H" then the assigned heading. Similarly to the assigned speed you can select the rate values from the popup list. Assigned heading is propagated to other controllers via scratch pad text in a form HXXX. If the other controller uses EuroScope too this type of scratch pad text will be recognized as assigned rate. When the aircraft is directed to a waypoint using the popup list from /sector exit point/ then the name of the point will be visible here.
Important: When making a simulation session (alone or for a candidate) setting the assigned heading will drive the simulated aircraft to the specified heading. In this case it is really important to be able to turn the aircraft to the left or to the right. For that the list contains the values from -360 degrees to +360 degrees from the actual heading.
14. Текстовое сообщение (Text message) - поле для ввода текста
Note that if the scratch pad is recognized by EuroScope then the scratch pad remains empty and the appropriate other item is changed. On the other hand if the scratch pad is not empty a static letter "I" is displayed over the first line. The length of the scratch pad is limited to 60 chars only, but be careful with long texts as other radar clients are limited to 3 or 4 characters only. By clicking on the scratch pad area in the TAG the message itself can be edited there.
Меченный
Немеченный
Немеченный формуляр сопровождения является очень сжатым с ограниченным количеством доступной информации. Только код ответчика и высота отображаются в нем. И цвет формуляра может отличаться.
Рисунки расположены в таком порядке: не связанный (не имеет отношения к Вашему сектору), уведомленный (имеет отношение к Вашему сектору) и лишний (взятый другим диспетчером на контроль).
Перемещение формуляров
В EuroScope положение формуляра относительно метки никак не ограничивается. Вы можете свободно двигать его вокруг метки в любом направлении и на любое расстояние. Нажмите на свободном месте формуляра левую кнопку мышки и держите ее, а затем двигайте.
Если после передвижения, пока Вы не отпустили левую клавишу мышки Вы нажмете правую, то Вы прикрепите формуляр к данной позиции и он не будет двигаться вслед за меткой. Чтобы "отклеить" формуляр просто сдвиньте его с места.
Переход между состояниями
Чтобы перейти из одного состояния формуляра к другому, сделайте двойной клик на метке или свободном месте формуляра. Чтобы вернуться в предыдущее состояние формуляра повторите двойной клик.
| Руководство по EuroScope | ||||||||
|---|---|---|---|---|---|---|---|---|
| Быстрое начало работы | Быстрое начало | Установка | Где сохраняются настройки | |||||
| После подключения | Подключение | Настройки подключения | Настройка голосовой связи | Настройка оборудования для голосовой связи | Скачивание файлов секторов | Голосовой ATIS | Voice alias | Особенности подключения |
| Некоторые детали | Симуляция проф. радиолокатора | |||||||
| Радарный экран | Экран | Панель меню | Основные списки | Продвинутые списки | ||||
| Формуляры | Формуляр сопровождения | Редактор формуляров | ||||||
| Настройки | Связь между диспетчерами | Основные настройки | Меню символов | Plug-ins | ||||
| Тренажер | Тренажер | |||||||
| Приложения | Описание ESE файла | Файл сценария | ||||||
